Find the best exit intent popup plugins for your site based on your goals. Exit-intent popup plugins for WordPress are plentiful but not equal when trying to grow your email subscribers.
We help you turn your blog into a business, building the brand you want on your terms.
Find the best exit intent popup plugins for your site based on your goals. Exit-intent popup plugins for WordPress are plentiful but not equal when trying to grow your email subscribers.
The storytelling in blogging series continues with the one-time stories you need to tell and the trigger anchor text to use in order to turn visitors into fans.

As I laid out in the first of this series, Why Storytelling in Blogging Matters, you know that stories sell. They sell products, services, the words you type, and they help you sell yourself. But what stories will help a reader invest in you? What stories do you need to tell in order to turn readers into fans? And what engaging, curious, or emotional trigger anchor text can you use to get them to find out more?
We’re still early on in the storytelling in blogging series. These are the bare-bones basics we’ll be covering:
There are affiliate links in this article which means at no additional cost to you, we could receive compensation for our recommendations. You can read our full disclosure policy.
Why do you blog? What is your origin story? Why do you spend 4 hours on an article that’s read in 4 minutes or 3 hours prepping, testing, photographing, and writing up a meal which will be made in just 20 minutes?
In Simon Sinek’s book, Start with Why, he posits that finding the answer to this question is the reason people want to hear from you. Why do you blog?! Why do you blog about your topic, specifically?

ACTION: Take a few minutes and write 3 reasons you choose to do what you do. Next, list 3 ways in which you help readers. Finally, craft 4-7 sentences which detail why you blog.
If you want to work ahead, brainstorm a few trigger anchor text phrases which would really pique a reader’s curiosity about your story. What would make them click through?
If you truly want to help people, it shows in your writing. You write from a “we” position, not from a “me” place. They need your story, your help, your support. Telling them why you do what you do will help them decide whether to invest in you.
But that’s not the only story they need to hear.
If we are honest with ourselves, we try to be all things to all people. But we can’t be all thing to everyone and sometimes, it’s admitting that which helps us gain clarity.

When you started your blog, what consumed your thoughts? Was it how you were going to help people or what problems you could solve for them?
Sure.
But your focus quickly became:
As you now know, dear seasoned blogger, one can have the fanciest theme, the “best” email provider, and the perfect logo and never make a dime or see a single pageview other than from their mom. #sadtrombone
I don’t normally work with brand new bloggers because I believe the value of a blog is in the content. If one doesn’t have content, does one really have a platform, let alone one they can turn into a business?!
I know what I am NOT to people and in telling them that, I give them a plan. I also deliver the message that I’m not in this just to amass as many clients as I can or that I’ll work with anyone who has a pulse. I tell them my “nope, not me” story and solidify my place with them.
ACTION: It’s your turn to identify what you’re not. Spend a couple of minutes narrowing your focus by detailing what you’re not so that you can attract your ideal reader. Your goal is to get 2-3 sentences detailing your “nope, not me” story.
An about page may be your first thought to where to put your one-time stories and you’re right! Make sure both of these stories end up on that page. But don’t stop there!
The About Me page shouldn’t be the only place your readers see your stories.

In nearly every post, you can position yourself to engage the reader with these two stories. You can (and should) use powerful anchor text to link to your about page.
Pro Tip: People often ask me what to do when a post goes viral but their bounce is off the charts high (meaning, the reader only reads that post and nothing else). I tell them, among other things, that they need to add powerful anchor text to their viral.
As a reminder, anchor text is the text which is underlined and, when clicked, opens the linked article or page. Our goal is to make anchor text relevant to the destination’s topic (SEO-friendly) while piquing a reader’s interest enough to get them to click through. Read more about anchor text best practices.
Before we move on, I want to be clear – we will deviate from traditional anchor text usage for SEO. Your goal isn’t to rank your about page. The purpose with engaging anchor text is to get a first-time reader to click TO your about page.
And we develop trigger phrases because they will:
Let’s use a client’s site which is a blog about helping obese people start a running regimen. On the about page are the why and ‘nope, not me’ stories. Let’s set them up so we’re all on the same page…
The author’s “why” story is that she was:
On this page, she states that she knows of so many others like her who are too embarrassed to seek help or cannot afford to hire a fitness trainer.
Her “nope, not me” story on this page is that she:
Remember: her trigger anchor text should be designed to lead people to read more about WHY she is writing for them, WHY she wants to help them, and WHY they should invest in her. Her job is to get the reader to click through.
Some trigger anchor text for her could be (underline for anchor text example):
People are inherently curious about other people, so we need to use that to our advantage.

Your trigger phrase could be something about you and the reason you started your website or business but ultimately, your trigger anchor text should be rooted in curiosity, emotion, or problems.
Some examples are:
Trigger phrases allow you to organically link to your about me page seamlessly. They are designed to get a new reader to learn more about YOU and your “why.” They also remind an existing reader why you write for them.
It’s your turn. Add the sentences you’ve written detailing your “why” and “nope, not me” stories to your about page (and topic pages). Review your most popular articles and brainstorm a few ways you could use anchor text to engage the reader to click. Update the articles and incorporate at least one link back to these stories in every article you write.
Still to come in the storytelling in blogging series, we’re going to tackle storytelling in posts by detailing structure, copywriting tips, and so much more. Be sure to sign up for the once-weekly NDC newsletter to stay informed.
If you have questions about this series or want to brainstorm your origin story and trigger text, pop into the Elevate Everyone group on Facebook.
I’m sharing my blogging toolkit and resources I can’t live without. Each week, I’m asked what I use on ND Consulting and other sites I own and now I’m dishing all!
Every blog, blogger, and audience is different and there are many amazing tools which support each. I’m sharing my blogging toolkit and resources I cannot live without.
There are affiliate links in this article which means, at no additional cost to you, we could receive compensation for our recommendations. You can read our full disclosure policy.
Pro Tip: it doesn’t matter if it’s WordPress or Square Space, just get a self-hosted if you have an income strategy. If not, write on Blogger (powered by Google) or WordPress.com (limitations).
What I use:

Pro Tip: I love themes (they make everything so easy but don’t discount builders. I’ve been a fan from the early days of website builders because they allow for A LOT of customization.
Pro Tip: don’t ONLY write in WordPress or Blogger, even if you back up. You’ll find there to be a lot of distractions and it’s nice to have a backup off-site.
Pro Tip: don’t try to do it all. Pick one, build a strategy, execute, and when you start to see growth, add another network.

Pro Tip: THERE IS NO BEST EMAIL SERVICE PROVIDER (ESP) no matter what their sales copy (or another blogger) says. I have used so, so many ESPs, and I like them for different reasons. Additionally, the ESP you choose will greatly depend on where you are in your blogging and monetization journey.

Pro Tip: Just use something enough that the learning curve is worth it. I now love Photoshop but still use the pro plan of PicMonkey DAILY (because I haven’t figured out how to do everything in Photoshop). #newb
Pro Tip: have a system to make sure you are clear (and will always be clear) on the licensing. After 10 years of this, I’ve stopped buying or downloading anything personal-use only. You can get my three, free font and graphics guides in the Resource Library or sign up to my Freebie Fri-Yay emails.
Pro Tip: Don’t sign up and promote “ALL.THE.THINGS!” Get my ‘how to introduce an affiliate’ guide in the Resource Library to learn how to select and onboard your partners. That way, you’ll actually make money.
Get access to the library:
Get Free Access to Our Resource Library!
My primary affiliate partners in my blogging toolkit and resources vault for ND Consulting are:
Pro Tip: Use whatever doesn’t make you all stabby. Safari makes me stabby and I honestly couldn’t live without some of my Chrome extensions.
Pro Tip: If you don’t have Google Analytics because you can’t figure out how to add it to your site, pay someone to do it. It’s the industry standard.
Kind of like your political preference, no one REALLY needs to know your backend. 🙂 I use all of the following (and I bet a few more), but because I pay people to do this for me, I really can’t tell you anything about them.
What I do know that’s currently in use (and protecting my sites) as part of my blogging toolkit and resources set up are:
I use a few to manage my businesses, some free and some are investments to help make accounting and tax time easier.
Other than my camera, my biggest blogging tool is by far my laptop. I can take it anywhere, use my phone for Internet access, and bang out a few affiliate shares or even a post while I wait on my daughter.
I am constantly learning and even build it into my weekly schedule. Some of my favorite resources:

I strongly advise you not to work with brands or even other bloggers without contracts. Developing your own or hiring an attorney can be tricky. This is one of the most important parts of your blogging toolkit and resources. I use:
Which of these tools do you use? Can you suggest something in the comments you love? These are the blogging toolkit and resources I love, but I’d be grateful if you gave any insight into tools you use daily.
In this training, you’ll learn how you can increase affiliate income with custom sidebars. Also, you’ll eliminate clunky affiliate link management with a free tool!
Affiliate income isn’t passive (in the beginning) but if you want to make money blogging, it’s can be a strong income stream. If you’re on the weekly tips list, you’ll know that my clients have had HUGE increases to their affiliate income streams when we go beyond just linking.
Psst: Do you want case studies and tips to grow your affiliate income? Sign up for weekly tips:
Get Free Access to Our Resource Library!
I created a training video which goes into a bit more detail than this article does. You’ll learn how to use free tools to increase impressions (and potentially click-throughs) to your affiliate partners.
What are the ways we can increase our affiliate income with custom sidebars? Here are a few types of sidebars I recommend:
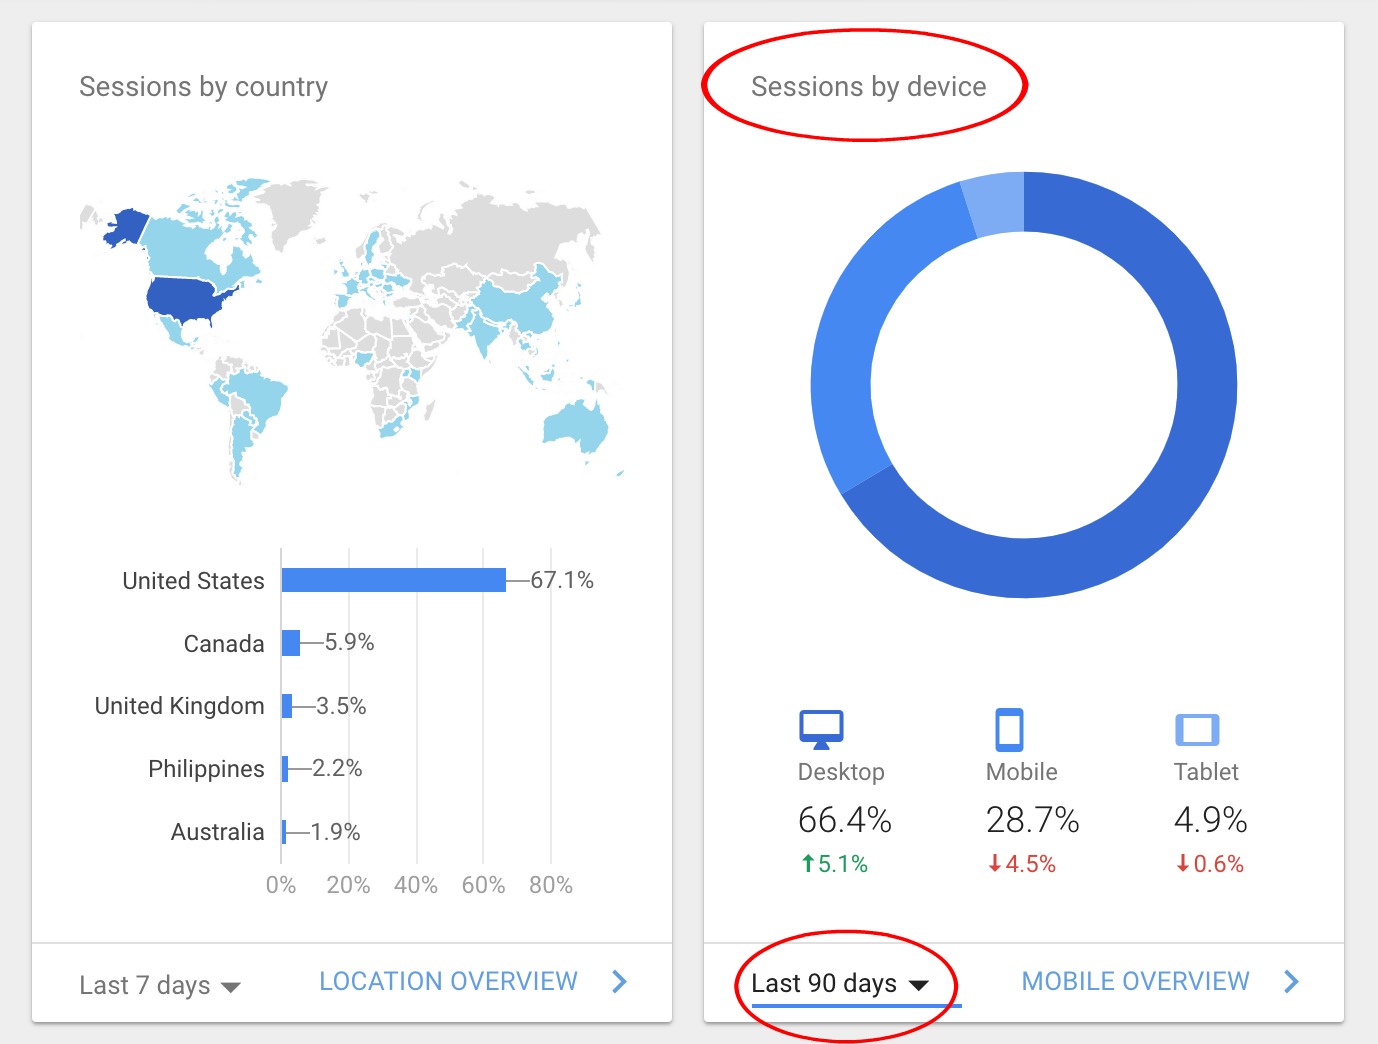
If you don’t have at least 50% of your traffic source from desktop users, your time might be better spent maximizing your inline affiliate content. How do you know what devices your readers are using?
To find out, just log in to Google analytics, scroll down on their new Home page, and check out the “Sessions by Device” graph located just below traffic acquisition. I like to look at a rolling 90-day trend and to do so, just drop down the menu which says, “Last 7 days.”
When creating custom sidebars, you can design anything your heart desires. To maximize affiliate income, however, you’re going to want to stick to your core affiliate partners. These are those partners who have resonated with your audience already and for which you’ve tested their products or services.
Next, you’re going to determine what type of sidebar you’ll use. Above, I mentioned a few I use:
You’ll need both the shortlinks to your affiliate partners (the Easy Affiliate Links) and the code for your images. If you don’t dream in HTML, just open up a new article, import your media, create a link on the image using your Easy Affiliate Links, and copy that code to be used in your sidebar later.
If you’re using the free custom sidebar resource I noted above, drag and drop the elements to create your sidebar. When creating the actual sidebar, you can control the image views (you can assign it to individual posts or you can have it be assigned to all posts within a category).
Save your sidebar. Note: you might have to clear your cache in order to see the new sidebars if you’re assigning it to existing material.
The reason I push using an affiliate link manager like Easy Affiliate Links is because it’s a super-duper quick update for all links. Additionally, you may easily update the HTML code by altering it in the sidebar quickly.
If you skipped the video, I strongly urge you to watch it because it goes into more detail on how to increase affiliate earnings with custom sidebars. Let me know – is this a tactic you’ve used only for content or have you branched out and created your own affiliate sidebars?

Here are the major health concerns for bloggers to be aware of while building a business online. Included are ways to overcome and avoid them – ‘cuz who wants to die early?!
